
Telegram bot in 3 minutes (Part 2) - Forms and Inline Buttons
In this article, using the no-code bot constructor @MenuBuilderBot, we continue to explain what you can add to your Telegram bot in 3 minutes.
In 3 minutes, we'll create:
- An inline «Pop-up Window» button
- An inline «Share Link» button
- A Form with two questions and a message for the user
- A form question with choose one option as answer
- A form question with a single answer
- We'll show you how to move buttons in the created menu.A distinctive feature of bots created with the @MenuBuilderBot constructor is that it does NOT advertise itself in your bots, does NOT force ads, does NOT force subscriptions to third-party channels, and does NOT have hidden fees. All bots are hosted on servers - absolutely free.
This series of articles for no-code and low-code development beginners will help you create your own Telegram bot and add functionality to it. Each article is a text version of approximately 3 minutes long video. The material is presented as concisely as possible, with links to additional information.
This is the text version of the video:
This is the text version of the video:
- on YouTube https://youtube.com/shorts/wXBoyuy1YkI
- on TikTok https://www.tiktok.com/@menubuilderbottiktok/video/7672380897311706375
- and Instagram https://www.instagram.com/reel/Db5OtDSR9Fm/
Create an inline button with «Pop-up Window»
We will create an inline information button with a pop-up window, for the message of our Referral System.
While in the main menu:
• Click: «📝 Post Editor»
• Click the previously created «ref system» button to work with the message of this button.
• In the message with the data of the previously created message, click the inline button with an asterisk (*️⃣) to access the message settings.
• Click: «➕ Inline Button»
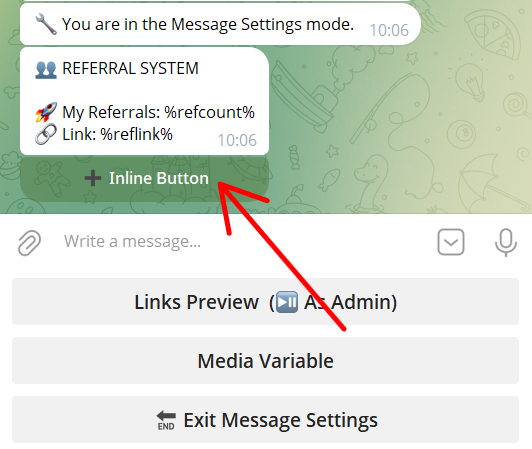
• Select: «Button Mode: Pop-up Window»
• Enter (in two lines) the inline button data (title and pop-up message text):
For example:
“ℹ️ Info
You get 0.01 Gram for each referral!”
• Send a message to the bot.
Without leaving the editor, let's immediately add a second inline button.
Create an inline button to «Share the Link»
The Inline Button Editor becomes available with its own modes, only after creating the first inline button:
- «Edit» (allows you to change the created buttons)
- «Delete» (allows you to delete the created buttons)
- «Move» (allows you to move the button to the left by pressing it - thus changing its position in the menu)
- «Add» (allows you to add new buttons - by specifying the place in the menu - new button will be added under the pressed one)
Selecting the desired mode and interacting with the menu buttons (by default, the mode is «Add»).
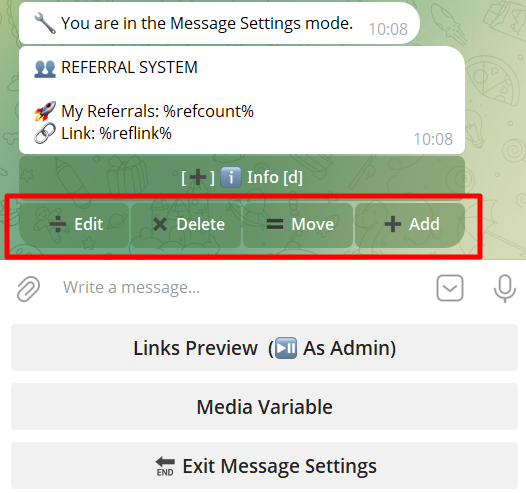
We want to add another button, so we need the «Add» mode.
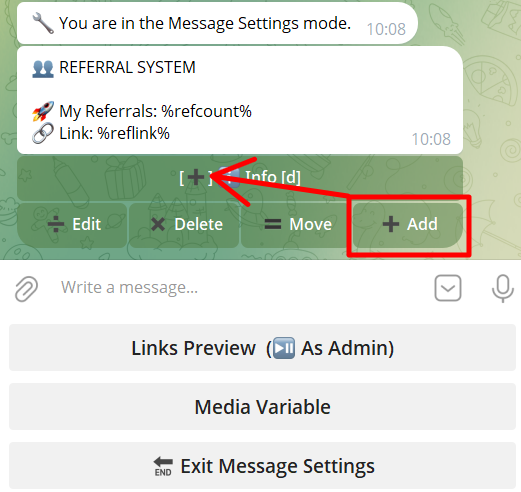
The selected mode is indicated by an icon in the button's title.
To add a new button, by clicking we indicate under which button you want to place the new one.
Read about all the functions used by following the links:
- Guide to the «Referral System»
- Guide on «Inline Buttons»
Adding a Basic Feedback Form
A Basic Form can consist of one or more questions and standard messages. Its main feature and purpose is simplicity and speed of creation.
More complex Forms - Custom Forms - can be created manually using the constructor's universal functionality. Responses can be collected into variables, aggregated responses can be saved in groups, and full-fledged communication with each user can be created in a separate Topic - but these are subjects for a separate discussion (see the link to the manual below).
Let's create a separate button for our Form
While in the main menu:
• Click: «🎛 Buttons Editor»
• Click the previously created «My Account» button - so that the Form button is created UNDER IT.
• Click: «➕ Add Button»
• Enter the button's name:
For example: "Feedback Form" (you can give your own name)
• Send a message to the bot.
Moving a button in the menu (changing its position)
To demonstrate this feature, let's place the Form button next to the invisible Referral System button from the previous tutorial.
To do this (without leaving the Buttons Editor), click the inline button with the arrow down «⬇️» in the information message of the button we've just created. The button will move down one line.
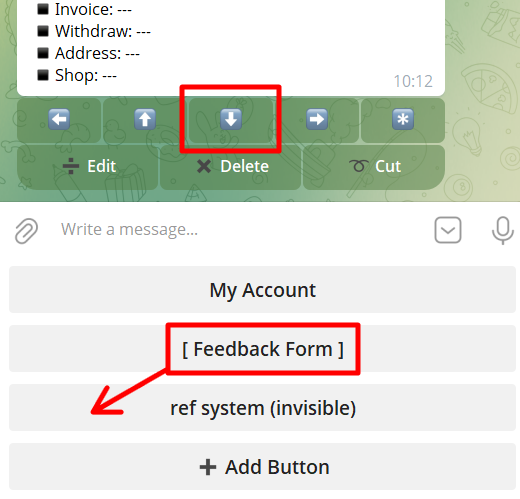
Using these arrows, you can change the position of the highlighted button in your bot's menu.
A Choose one Answer Question
You don't have to leave the Button Editor:
• Click: «📝 Post Editor»
• Click the previously created «Feedback Form» button to create a Form inside this button.
• Click: «➕ Add Question»
• Select: «🔢 Choose One Answer Question»
• Enter the question itself:
For example: "Select one option:"
• Send a message to the bot.
• Enter the answer options for the user (each on a new line):
For example:
"Option 1
Option 2
Option 3" (you specify your options)
• Send a message to the bot.
A Single Answer Question
Without leaving the Post Editor:
• Click: «➕ Add Question»
• Select: «🔤 Single Answer Question»
• Enter the question itself:
For example: “Enter your question:“
• Send a message to the bot.
A regular message inside the Question Form
Since Form's "Questions" are in fact the messages of a button, they can be combined with regular messages. Let's add a submission message to the end of the Form.
Without leaving the Post Editor:
• Click: «➕ Add Message»
• Enter a message:
For example: “Your message has been sent to the Admins!”
• Send a message to the bot.
• Close the Post Editor by clicking «🛑 Stop Editor».
A Form can have more question types: in addition to the «Single Answer Question» and «Choose One Answer Question», there are also «Multiple Answer Question», «Contact Request», «Location Request», «Roll the Dice» as well as numerous options, switches, and conditions (see the link to the manual below).
Form's settings
Once you've added Form questions to a button, a «Form Settings» section will appear in the button's settings. Here you can manage the Form's behavior and the display of its elements for both the user and the admin.
As a reminder, to access button settings:
• Click: «🎛 Buttonы Editor»
• Select the menu button, settings of which you want to change
• In the message with the button's data, click the inline button with the asterisk (*️⃣) to access its settings.
Response modes in the Form
This is what the user's response in Form looks like on the Admin side of the bot:
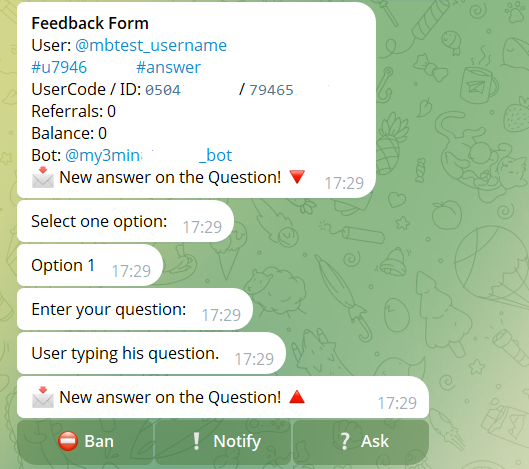
After receiving a user's response, the Admin can «Ban» the user, «Notify» him (without the possibility of responding for the user), or «Ask» (the user will be able to respond to the message).
For complete information on working with Forms, see the section «Feedback Forms and QnA Chat».
Result
What we've learned:
1. How to create an inline «Pop-up Window» button
2. How to create an inline «Share Link» button
3. How a Form with two questions and a message is structured
4. How to create a Form's question with a choice of one option
5. How to create a Form's question with a single answer
6. Where are the Form's Settings
7. How to move buttons in the created menu