
Telegram bot in 3 minutes (Part 1) - Quick Start
In this article, we'll show you how to create a Telegram bot in 3 minutes using the @MenuBuilderBot no-code bot constructor.
In 3 minutes we'll create:
- A new Telegram bot
- A «Message for Start»
- A Main Menu message
- A «My Account» section for the user
- An internal user balance in the bot
- An inline button with Referral System data
- Will add a referral reward with accrual to the balance variable.
A distinctive feature of bots created with the @MenuBuilderBot constructor is that it does NOT advertise itself in your bots, does NOT force ads, does NOT force subscriptions to third-party channels, and does NOT have hidden fees. All bots are hosted on servers - absolutely free.
This series of articles for no-code and low-code development beginners will help you create your own Telegram bot and add functionality to it. Each article is a text version of approximately 3 minutes long video. The material is presented as concisely as possible, with links to additional information.
This is the text version of the video:
- on YouTube https://www.youtube.com/shorts/crGf6PwzGnI
- on TikTok https://www.tiktok.com/@menubuilderbottiktok/video/7669869564796194068
- and Instagram https://www.instagram.com/reel/DbuwEmrx214/
Finding the bot constructor @MenuBuilderBot in Telegram
You can find it by the link: https://t.me/MenuBuilderBot or by searching Telegram itself as @MenuBuilderBot.
Adding a new bot - using Auto mode
Launch the bot with the command START (/start)
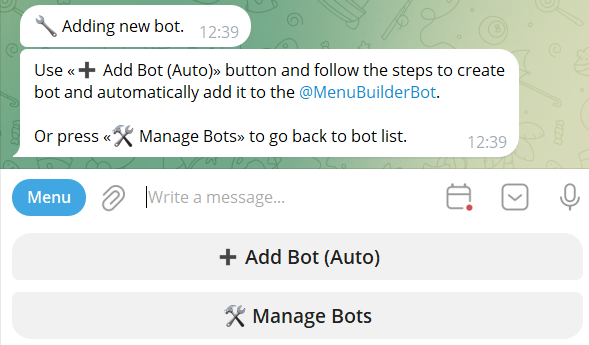
• Go to the section of adding a new bot: «🛠 Manage Bots > ➕ Add Bot (Auto)»
• Click: «➕ Add Bot (Auto)» to create a bot in Telegram under the control of the @MenuBuilderBot constructor.
In the «Bot Name» field, enter your custom bot name.
In the «Bot Username or Link» field, enter your desired unique bot address (Telegram will automatically add "bot" at the end).
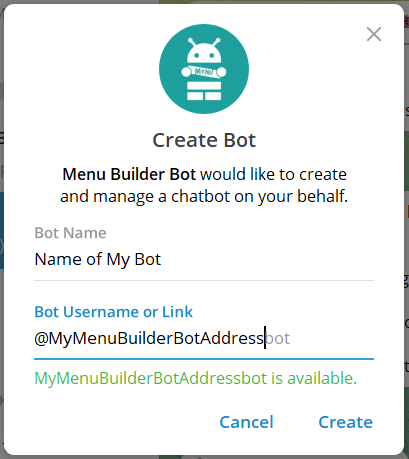
After clicking «Create», you'll be redirected to the Main Menu of your new bot - the bot is where most of the functionality is being developed.
A detailed guide on «How to add a new bot».
Adding a «Message for Start» with user's name Macros
The start message is visible only when the bot starts (immediately after the user sends a command /start).
Every new bot created using the @MenuBuilderBot constructor (BESIDES OTHER THINGS) already includes an Admin Panel and Editors for Buttons, Messages, and Balance.
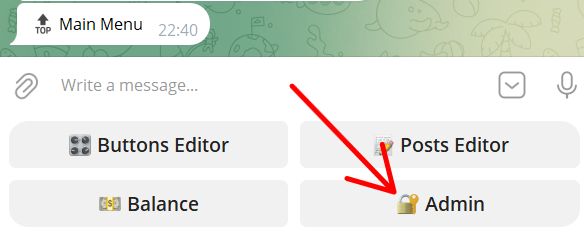
To add a starting message, go to your bot's Admin Panel
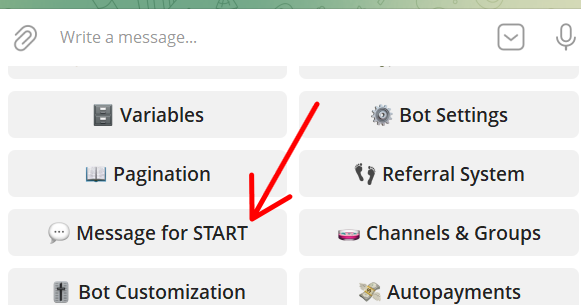
Find the section «💬 Message for START»
And enter a message with the user's first name Macro:
For example: "Hello %firstname%! This startup message is only visible once when the bot starts."
The macros %firstname% will be replaced with the user's First Name when displayed.
For information on that macros and other macros available in messages and buttons, see the article «Macros».
A guide for «Message for START».
Exit the Admin Panel and go to the Main Menu by clicking «🔚 Exit Admin»
Now, if you send a command /start to the bot, you'll see the message you have added.
Adding a Main Menu Message
Main Menu Message - visible to the user every time he exits to the Main Menu (Home) from the sub-menus.
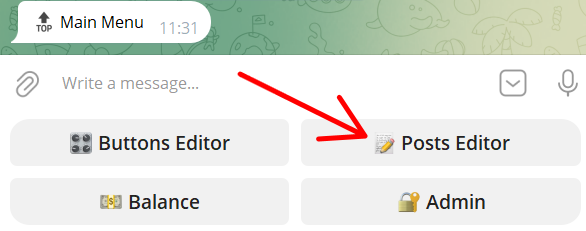
While in the main menu:
• Click: «📝 Post Editor > ➕ Add Message»
• Enter (or forward from somewhere) a new message:
For example: "This is a Main Menu message - it is visible every time the user goes to the Main Menu."
• Send the message to the bot.
• Close the Post Editor by clicking the «🛑 Stop Editor» button.
This is the standard principle for adding messages to the bot's menu. You add a message in the menu you're currently in. For more information on adding messages, see the «How to Add a Message» guide.
Create a «My Account» section with the User’s data
In the message of this button, we will display the user's data and, subsequently, add an inline button with the data of his referral system.
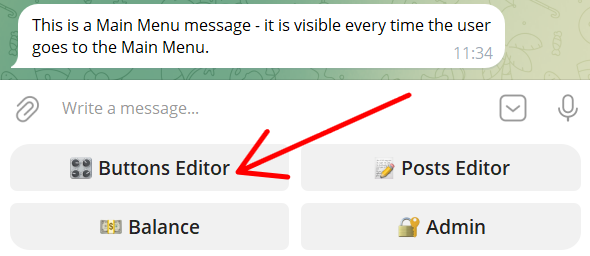
Creating a button for the «My Account» section
While in the main menu:
• Click: «🎛 Buttons Editor > ➕ Add Button»
• Enter the name of the button:
For example: «My Account»
• Send a message to the bot
• Close the Buttons Editor by clicking «🛑 Stop Editor».
Creating a message in the «My Account» section
While in the main menu:
• Click: «📝 Post Editor»
• IMPORTANT: click the «My Account» button (we will be transferred inside and the message will be added to it)
• Click: «➕ Add Message»
• Enter (or forward from somewhere) a new message with Macros:
For example:
"🗄 MY ACCOUNT
👤 Name: %firstname%
💵 Balance: %balance% Gram"
• Send the message to the bot.
• Close the Post Editor with the «🛑 Stop Editor» button.
Later we will add an inline button with Referral System data to this message.
Tutorial on «How to add a Button»
Creating a referral system
For the user, the Referral System will be presented as an inline button in the message of «My Account» section.
Creating a hidden button for Referral System data
While in the main menu:
• Click: «🎛 Button Editor»
• Click the previously created «My Account» button - so that the referral button is created UNDER IT.
• Click: «➕ Add Button»
• Enter the button name:
For example: "ref_system" (the name is not important - the button will be HIDDEN from the user)
• In the message with the data of the created button, click the inline button with the asterisk (*️⃣) to get to the button's settings.
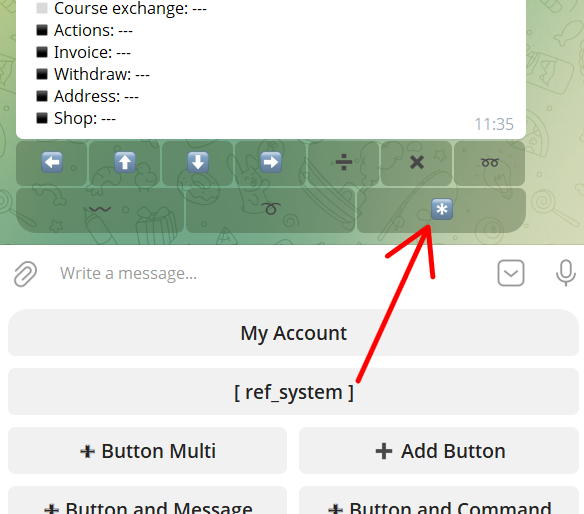
• Click: «Admin Only (▶️ On)» - this will make the button available only to the bot Admin and invisible to Users.
• Click: «Assign Command» - so that Users can access the button's message.
• Enter the command: "/ref"
• Send the message to the bot.
• Click: «✅ Confirm»
• Close the Buttons Editor with the «🛑 Stop Editor» button.
Creating a message with Referral System data
While in the main menu:
• Click: «📝 Post Editor»
• IMPORTANT: click the «ref_system» button (we will be transferred inside and the message will be added to it)
• Click: «➕ Add Message»
• Enter (or forward from somewhere) a new message with Macros:
For example:
"👥 REFERRAL SYSTEM
🚀 My Referrals: %refcount%
🔗 Link: %reflink%"
• Send a message to the bot.
• Close the Post Editor with the «🛑 Stop Editor» button.
Setting up the reward of Referral System
The referral parent receives a reward on the «balance» variable for each invited referral.
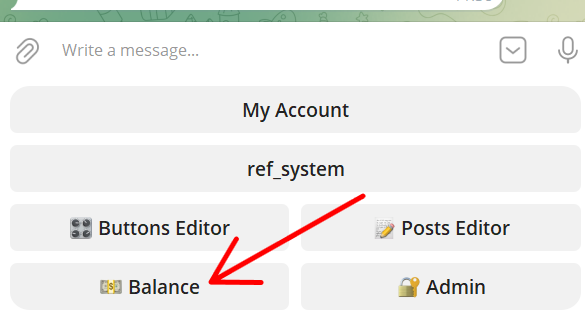
While in the main menu:
• Click: «💵 Balance > Referral Bonus»
• Enter the reward amount: "0.01" for each referral (you can set your own amount)
• Click: «Notify User (⏹️ Off)» - if you need to notify the Referral Parent about the accrual.
• Close the Balance Editor by clicking «🔚 Exit Balance».
Creating a Referral System's inline button in «My Account» section
From here, users will access the data of the hidden «ref_system» button.
While in the main menu:
• Click: «📝 Post Editor»
• Click the previously created «My Account» button to work with the message of this button.
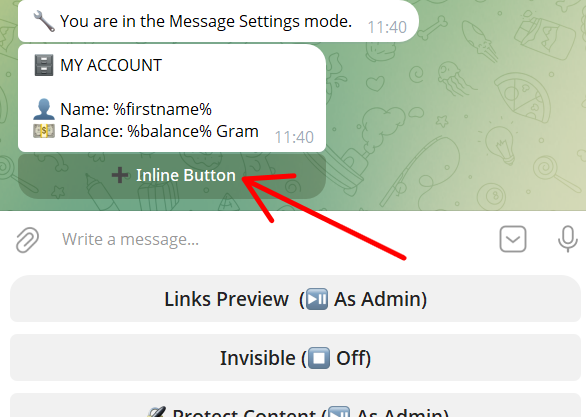
• In the message with the data of the previously created message, click the inline button with an asterisk (*️⃣) to get to the message settings.
• Click: «➕ Inline Button»
For more information on all the functions used, please follow the links:
- Guide for «Referral System»
- What is «Admin Only» button
- What are «Commands» and how to use them
- Guide on «Balance Editor»
- Guide on «Inline Buttons»
Result
What we've learned:
1. How to create a new Bot and connect it to the @MenuBuilderBot bot builder
2. How to add a "Start Message" - which is visible only when the bot is started
3. How to add a Main Menu message
4. How to create a lower menu button
5. How to add a message to the lower menu button
6. How to use Macros in messages
7. How to create a hidden button (visible only to the bot's Admin)
8. How to add a command to the lower menu button
9. How to add a reward for a referral
10. How to notify the user about the accrual to the Balance variable
11. How to add an Inline button to a message and call the lower menu button by command
12. How to create a Referral System in your bot.