
Working with API Modules
In this guide, we will look at the process of connecting the «API Module» and setting up its operation - using the example of the free Demo Module «Number Convert (DEMO)».
In general, the SETUP of interaction via API consists of TWO STAGES:
1. Connecting the corresponding API Module to your bot.
2. Setting up the Action to interact with the API of the External Service.
In general, the WORK of the configured connection looks like this:
When the User clicks the button you configured, the Action sends the Request you created with the specified Parameters and the API Module begins to wait for a response from the External API (usually a few milliseconds). After receiving the response, the data from the API response is associated with special Action macros, after which they become available in the Actions Chain of the current button. Then you can work with them, like with any other data (display in messages, save in variables, etc.).
❖ Connecting the API Module
Since in the future, it is planned to add a fairly large number of API Modules to the system, and for each individual bot only a few of them will be needed (so in order to do not clutter the interface), it was decided to place the list of API Modules in a separate section and provide the ability to connect them separately as needed.
Go to the Modules section
To connect the API Module, go in your bot:☞ 🔐Admin | 🗜API Modules | ➕Add API Module
Select API Module
For the purpose of this manual, select the Module «Number Convert (DEMO)».
This is a free demo module, further configuration will be done using it as an example.
API Key
Enter the API key for the selected system.
To be able to work with any API, you need to have a Key. The Key is usually obtained in the settings of the system you are configuring to work with. In each individual case, the location of the Key will depend on the specific project.
In this case, the key can be obtained in the same menu - see below.
Request API Key
Request automatic key generation for Demo and Integrated Services.
This function will allow you to get an API key for those services that are either demo for the @MenuBuilderBot constructor or deeply integrated into its functionality. In this case, the key is generated "on-spot" - directly in the settings and there is no need to enter it manually.
Test and Enable Module
Activate the Module.
After you have received, copied and saved the key, you need to indicate to the system the need to check the key you specified - the system will activate the module automatically if the check is successful.
Name
Provide your Module name (OPTIONAL).
The option allows you to specify your own (possibly short) name for the module you have connected. You will see this name in the menu during further settings of the API.
If the name is not specified, the API Key will appear as an identifier in the Module's button name during selection - which may make the button look unpleasant.
Depending on which module you are configuring, this section may have other settings. All of them will be described in the corresponding manual for each specific Module.
This completes the activation of the API Module. Next, we will configure its operation in the scenario of Bot Menu.
❖ Creating a number input Form
Creating a variable input form is FOR THE PURPOSES OF THIS GUIDE ONLY and is necessary for the best demonstration of the integration of the API Modules functionality into the functionality and scenarios of your bot - create a Form only if you are exploring the possibilities of working with the API using the sequence of steps indicated here.
The Module we are looking at («Number Convert (DEMO)») accepts a number specified by the user and converts the digits of its font into numbers of another Unicode font (into circles, to be more specific). Thus, we will need a variable in which we will save the user's input, and then, using an action, we will pass its value to the API for conversion.
Creating a variable
Create a Numeric variable - «num».
For information on how to add a variable, see the «Variables Guide».
Creating a Variable Input Form
Add a Form to the menu with the input of the Variable you have created earlier («num»).
For information on how to add a Variable Input Form, see the «Forms Guide».
❖ Setting up an Action of API Modules
After the required API Module is activated in your bot, you need to configure its direct interaction with the API in the menu scenario. The interaction is configured using a special «Action of API Module», which you add to the menu button, upon clicking of which, you want the interaction with the external API to be performed.
For information on how to add and configure an Action, see the «Actions Guide».
Adding Action of API Modules
Add an Action to the menu button you want, in the necessary place of the Actions chain.
For the purposes of this guide, we will need a «Post-Action» - because it should work after the user enters the number he needs into the variable «num» - that is, after the Form we have created earlier. Obviously - in general, you choose the Action TYPE in accordance with your needs.
Action setup is done using a step-by-step Wizard.
1. Selecting the Module
We select the Module we have created earlier («Number Convert (DEMO)»).
In the first step, you will be asked to select a module from the list of those that you previously activated for this bot. Further settings may differ depending on the specific Module selected.
In this tutorial we have only one module activated («Number Convert (DEMO)»). All the parameters for setting up this Module are given AS A LIVE EXAMPLES in the Action's Settings Wizard messages themselves - you can take them from there.
2. Specifying the API Endpoints
API DATA: All data on each specific API should be viewed in its documentation. Documentation for the «Number Convert (DEMO)» Module is located at: https://api.menubuilder.cc/api_test/docs.
For our module, the Endpoints are requests/convert.
The request method is GET.
«Base URL», as well as «API Key» and «Bot ID» - will be substituted by the Module automatically - you do not need to worry about them.
For more information on the structure of the API request URL, see the guide «What is API and how it works».
3. Associate the REQUEST data
REQUEST is when your bot sends data to an External API for processing.
At this step, we select what data we will send to the API.
- Data is associated using the assignment sign "=" (equal).
- Parameter names are taken from the API documentation.
- The API Parameter comes first and it is being assigned with a Value.
- The Value can be taken from a Variable or directly specified as Text or Number.
- Parameters from a Macro are specified like all bot macros - with percent signs ("%"), text and numbers - without additional signs.
- Each Parameter must be placed on a separate line.
- Each specified Parameter must be assigned with a Value.
For example:api_param1=%your_macros% - a parameter and a variable macroapi_param2=your text - a parameter and plain textapi_param3=123 - a parameter and a number.
In our example, we saved the number entered by the user in the variable «num». We gonna transfer this data via the API. For this purpose, in the documentation of our API (https://api.menubuilder.cc/api_test/docs) there is a parameter «number» - which is specially designed to transfer the number that needs to be converted.
Associating the Parameter («number») from the API documentation, with the variable we have created («num») in which we previously saved the Form data.number=%num%
Note that the Parameter «number» comes first and is specified without percent signs, and the variable is specified as its macro - with percent signs ("%").
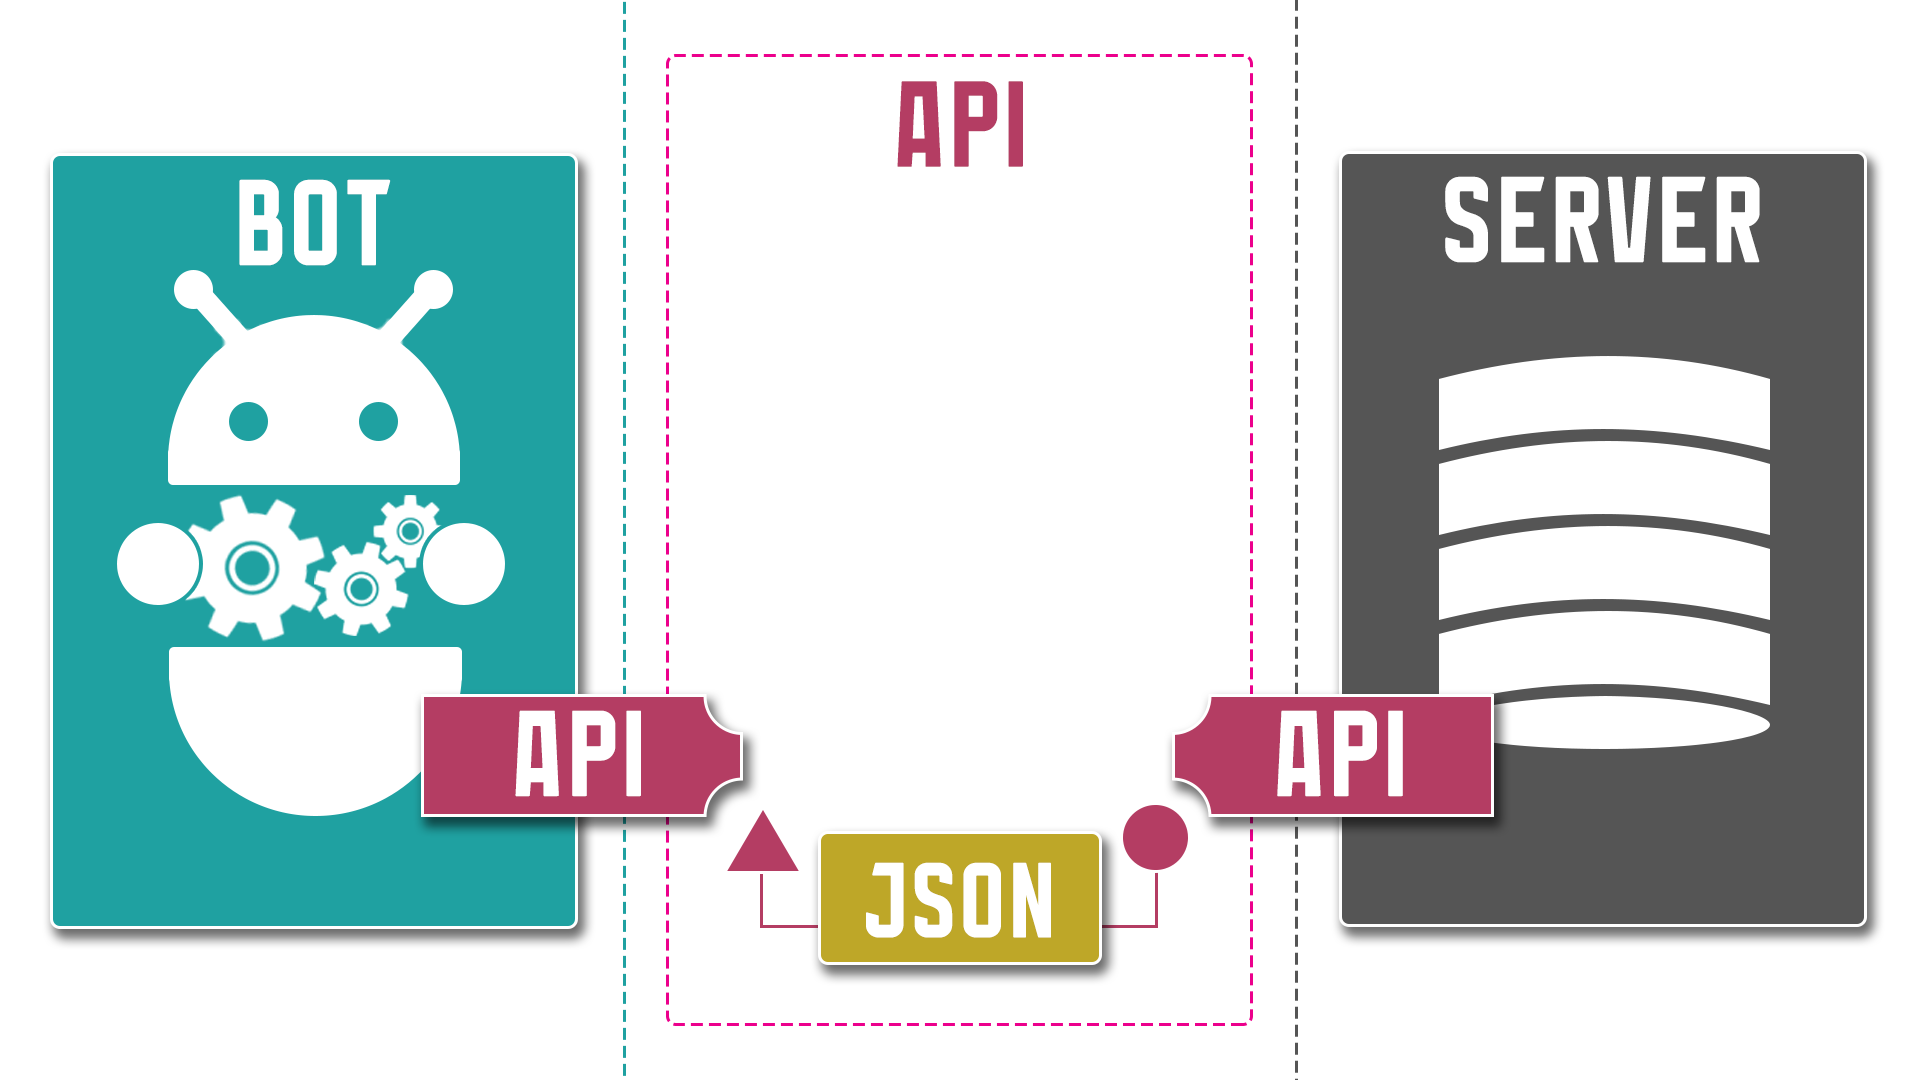
4. Associate the RESPONSE data
RESPONSE is when the External API, after processing, responds to your previous Request.
At this step, we select which data from the API response we want to pass to the bot.
- Data is associated using the assignment sign "=" (equal).
- Internal Macros are assigned by YOU.
- The name of the Internal Macros comes first and it is being assigned with the value from the API Parameter.
- The names of the Parameters in the response are taken from the API documentation.
- Response parameters are specified with percent signs ("%").
- Internal Macros values are available only in the current Action Chain (NOWHERE else).
- One Internal Macros can be assigned with several API Parameter values at the same time.
- Each Internal Macros must be placed on a separate line.
- Each specified Internal Macros must be assigned with a Value.
For example:your_macros1=%api_param1% - a macros and one parameteryour_macros2=%api_param2% %api_param3% - a macros and several parametersyour_macros3=%api_param4.api_param1% - a macros and access to the SUB parameter of the Object (dictionary)your_macros4=%api_array[0].api_param1% - a macros and access to the SUB parameter of the Array.
More information on the syntax for accessing JSON Properties, see below.
In the frame of our example, as an API response, we receiving a converted number (a number in a different font). We will pass this data to the Internal Macros. According to our API documentation (https://api.menubuilder.cc/api_test/docs), the response comes in the «result» parameter of the JSON file.
Associating the Internal Macros we have created («response») with the parameter («results») of the API response, from the documentation.response=%result%
Note that the Internal Macros «response» comes first and is specified without percent signs, and the Response Parameter is specified as a macros with percent signs ("%").
5. Adding Action message
After we have stored the API response data in the Internal Macros «response», we can use it to show the data in a message.
Example of message: "Your reply: %response%".
Here the Internal Macros is written according to all the rules with percent signs ("%") - since this is a normal message.
In addition to the direct data output by using Internal Macros in the Action's message itself, existing Internal Macros with data can be used in the subsequent Actions Chain to save it in variables. This will allow you to further work with this data inside the bot - on a general basis, just like with any other data in variables.
In the messages of the button itself, Internal Macros are NOT available.
❖ JSON Properties access syntax
Most often, you will receive a JSON file as a response.
For the information on what a JSON file is and how it works, see the guide «What is API and how it works».
Below we will look at the syntax used in Actions to access JSON properties from an API response. We will take a simplified version of the file from the manual above, to go through all the options.
{
"firstName": "John",
"lastName": "Connor",
"address": {
    "street": "Valerio Street",
    "city": "Winnetka"
},
"friends": [
    {
    "firstName": "Bob",
    "age": 30
    },
    {
    "firstName": "Tim",
    "age": 14
    }
]
}
your_macros1=%firstName% - direct access to the Property - will return "John"your_macros2=%address.city% - access to the Object «address» and its element (Property) «city» - will return "Winnetka"your_macros3=%friends[0].age% - access to the Array «friends», its first element (numbered [0]) which is an Object and its element (Property) «age» - will return "30".
❖ Error messages
ERROR: Macros are not parsed (although the API works).
This means the API returned nothing. For example, when requesting a product or order - if there is no such product or order.
ERROR: Array in API response JSON file does not have a Key (name).
If the Array does not have a Key (header), the name "data" is generated. You can access such an array by this Key.