
Button - Invoice
The @MenuBuilderBot bot constructor allows you to automate the work with third-party payment systems in your bot. You can automatically accept payments, as well as withdraw funds accumulated by users in the bot. Sending reports on Deposits and Withdrawals to public groups is available, all funds are stored on your own wallets.
The functionality of Invoice button is part of the Automatic Payments (top-up's) functionality, which allows you to accept and duplicate on the bot's balance, payments coming from third party (Third Party) payment systems and wallets.
Thus, users can automatically (without any participation from the admin's side) replenish their balance in certain conventional units, the value of which is correlated with the value of the assets transferred by them. The data itself is stored in variables as numeric values. The list of wallets, exchanges, payment systems and individual cryptocurrencies for which the autopayment functionality has been created is available in your bot:
☞ 🔐Admin | 🧩Extensions | 📂Autopayments
Features and instructions for activating Autopayments for each of the available payment systems, you will find in the same place (or in this web version), in this guide though we will talk about working with the Invoice button.
❖ Invoice payments
This function allows you to organize the replenishment of the bot's Balance for your users, using their wallets, by generating a payment link. The Invoice function, in fact, is a button with the necessary functionality and settings, created by the administrator using a step-by-step Settings Wizard.
To work with this functionality, you need to understand the concept of variables and how the abstract data of variables in the bot correlates with real monetary assets received on your third-party wallets.
What does the Invoice button allows
1. Each created button works with a separate currency from the list of those that you have activated to receive payments.
2. The button allows the user to specify the payment amount.
3. The button allows you to recalculate the payment amount at the rate specified by the admin. The exchange rate can be specified both using a variable and using the "Automatic Exchange Rates" function (see the "Additional Information" section) if they are enabled in your Bot.
4. Set up a message about successful payment and a message about failure.
5. You can also add a text with a description to the invoice to display it in your user's payment history, but not all payment systems are supporting it.
How the invoice button works
1. The user of your bot presses the button with the currency of his choice.
2. The bot offers him to enter the desired amount for payment. At the same time, depending on the settings, the amount can be specified both in the bot’s internal currency (if you have one), because the final amount for payment can be recalculated at the specified exchange rate, or directly in the currency in which the payment will be made.
3. After entering all the necessary data, an individual link will be generated for the user, by clicking on which he will be moved in his own wallet in an external (Third Party) payment system and will make a payment following the instructions of this payment system.
4. After the payment is confirmed by the external system, the funds will be credited to the user's Balance in the bot.
❖ Creation of an Invoice button
REMINDER: for each currency that you plan to accept, you need to create a separate Invoice button with its own PayID - provided to you upon activation of Autopayment itself.
1. Invoice button does NOT need to be purchased - the required number of buttons will be added to your bot by admins at the time of activating the Autopayment itself.
2. Create a regular button in the desired place of the menu and go to its settings:
• Go to your bot:
☞ Button Editor
• Select a button by pressing it.
• Press the inline button with an asterisk ( * ) in the button's data message to access its Settings.
3. Click «Assign Invoice» in the settings menu.
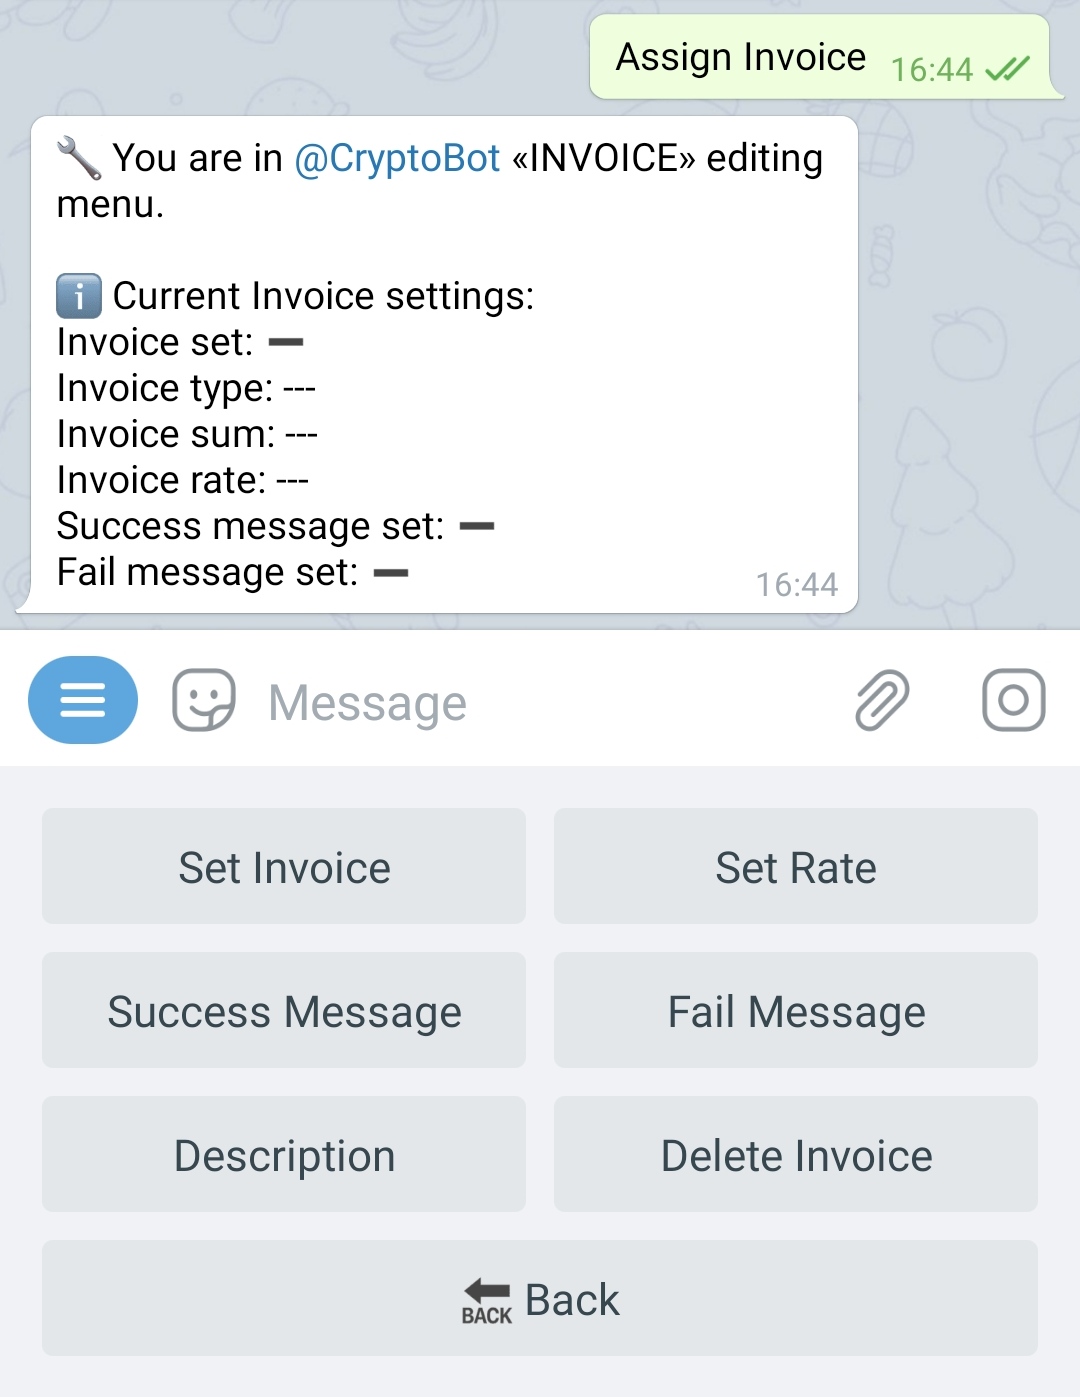
4. To start setting up the Invoice generation functionality, click «Set Invoice». The setup is presented in the form of a step-by-step Setup Wizard. Please note that the messages contain additional instructions and all possible options for each step.
4.1 First of all, you need to enter the PayID of the currency for which you are creating this button.
Each currency from the list you specified when ordering Autopayments will have its own PayID. PayID allows the button to "understand" what currency it will work with and what variable to charge (you specified this data while activating).
The list of PayIDs and their corresponding currencies will be given to you immediately after Invoice-autopayment is activated. If, for some reason, the list was not issued to you, go back to where you ordered Autopayment and contact through the appropriate form by asking a "Question About Autopayments":
📞 Form: @MegaHubSupportBot (💸 Activate «Autopayments» in Bot).
You do NOT need to re-order Autopayment itself.
4.2 Next, the bot will prompt you to select the Mode in which your button will work.
There are only two modes:
● Fixed Sum - you can predetermine the size of the payment. Here the bot will ask you to enter the fixed amount you need (you can specify a variable's macros as well).
● User-defined Sum - the user will be prompted to enter the amount he wants to pay. In this mode, you can specify the minimum and maximum amount that will be available to the user for input, as well as the message that will be shown to the user, necessary so that you can tell him all the data needed for input (minimum and maximum amounts, as well as conversion rate, if they were specified by you earlier) - in other words, show him instructions for entering the amount.
Purely technically, you can create several buttons for one currency - each with its own fixed amount, however, in this case, it's probably easier to give the user the opportunity to specify the desired amount himself.
4.3. Next, you will need to enter a message that will be displayed immediately BEFORE the execution of the operation. The presence of this message gives you the opportunity to show the user all the data entered by him and allow him to double-check it before actually sending a request for execution (all the necessary macros are available in the message for this).
5. Success Message - this message will be shown to the user if all the data entered by him was accepted and the request to generate an invoice was sent. In the message, you must note that the invoice generation takes from 1 to 3 minutes, as well as that the payment link will be sent to him in the same chat with the bot.
6. Fail Message - is an error message when an Invoice cannot be generated (most often incorrectly entered amounts). One way or another, with the help of macros, display the available information to the user and offer a solution, perhaps add a way to contact support.
7. Description (OPTIONAL) - this is a description of the payment that will be saved in the payment history of the external payment system. Not all payment systems are supporting it.
8. Delete Invoice - allows you to delete all Invoice button settings.
❖ Actions in Invoice buttons
● In the Invoice button, can also use a macro type "_v" (the same as in «Action of Numbers»). Use %invoice_v% to access the amount entered by the user for the Invoice.
❖ Additional information
To organize the financial system of your bot, the following are also available (may come in handy):
Balance Transaction Log
Log (Journal, Journaling) of changes is a function that saves the information necessary to restore the sequence of charges and is a historical record of all changes affecting the balance of the bot.
Balance Transaction Log.
To connect, go in your bot:☞ 🔐Admin | 🧩Extensions | 📂Logs and Data
• • •
Exporting User Data
Allows you to export to a file the data of ONLY those users who at least somehow manifested themselves in your bot, besides just wandering through the menu.
Export of User Data.
To connect, go to your bot:☞ 🔐Admin | 🧩Extensions | 📂Logs and Data
• • •
Currency Exchange Rates
It will add to your bot automatically updated exchange rates, which will have all the properties of variables, and also have their own macros for each currency pair and each exchange direction.
Currency Rates.
To connect, go in your bot:☞ 🔐Admin | 🧩Extensions | 📂Logs and Data