
Button - Withdraw
Bots constructor @MenuBuilderBot allows you to automate the work with third-party payment systems in your bot. You can automatically accept payments, as well as withdraw funds accumulated by users in the bot. You can send reports on payments to public groups, at the same time, all funds are accumulated on your own wallets.
Withdrawal functionality works in close connection and complements the capabilities of Automatic Payments (top-ups), which in turn, allows you to accept and duplicate on the balance of the bot, payments received from third-party payment systems and wallets. Thus, users can automatically (without the participation of administrator) replenish their balance in certain "conventional units", the value of which is related to the value of the assets they have transferred. In this case, the data itself is stored in variables in the form of numerical values. The list of wallets, exchanges, payment systems and individual cryptocurrencies for which the auto payment functionality has been created is available in your bot:
☞ 🔐Admin | 🧩Extensions | 📂Auto Payments
All instructions on connecting Auto Payments, for each of the available payment systems, you will find there, although in this guide we will tell you about working with Automatic Withdrawals.
❖ Automatic payments (withdrawals)
This function allows you to organize the withdrawal of funds accumulated by your users on the balances (in variables) of the bot, to third-party wallets and payment systems. The withdrawal function is a button with the necessary functionality and settings, created by the administrator using the step-by-step Settings Wizard.
To work with this functionality, you need to understand the concept of variables and how the abstract data of variables in the bot correlates with real monetary assets received on third-party wallets.
What the withdrawal button allows
1. Set up the withdrawal of funds from the user's balance (variable) for subsequent withdrawal, with all the necessary conditions, messages and data collection required for the transfer. Funds can be automatically returned to the user's balance in case of declined withdrawal.
2. Set up and send a withdrawal request to the admins in a separate group, with the ability to approve or decline withdrawal, after reviewing the request and manually transferring funds - in the case of a semi-automatic withdrawal. For systems in which automatic mode is available, the transfer from an external wallet is carried out directly upon approval of administrator in the group.
3. Configure messages to notify the user about approval, refusal, or non-compliance with conditions.
4. Set up a group and message for public reports on payments in your bot.
5. For payment systems in which a fully automatic transfer of funds is available, separate settings for the wallet ID, as well as comment on the automatic transaction, are available.
How the withdrawal button works
1. The user indicates the desired withdrawal amount and all the data required for this.
2. If all the conditions are met, then the amount indicated for the withdrawal is DEDUCTED from the user's balance into a certain output "buffer", and the message with the withdrawal request goes to a private chat with the admins.
3. If the request for some reason is REJECTED by the admins, then the funds deducted to the withdrawal "buffer" will be returned to the user's balance. If the admin approved the withdrawal, then he will have to click the appropriate button (description below) and either manually transfer required funds from the payment system wallet to the wallet address specified by the user, or (if the withdrawal is fully automated) the bot will carry out the transfer, with report message to be send to a private group with admins.
A configured and active group is required for the button to work (see below)!
❖ Creating a withdrawal button
1. Preparation
1.1 Purchase the required number of withdrawal buttons in your bot:
Button Withdraw.
To connect, go in your bot:☞ 🔐Admin | 🧩Extensions | 📂Buttons
1.2 Create a regular button in the desired place of the menu (if necessary) and go to its settings:
• Go to your bot:
☞ Button Editor
• Select the button by clicking it.
• Press the inline button with an asterisk (*) in the message with the button's data to enter its Settings.
1.3 Click “Assign Withdrawal” in the settings menu.
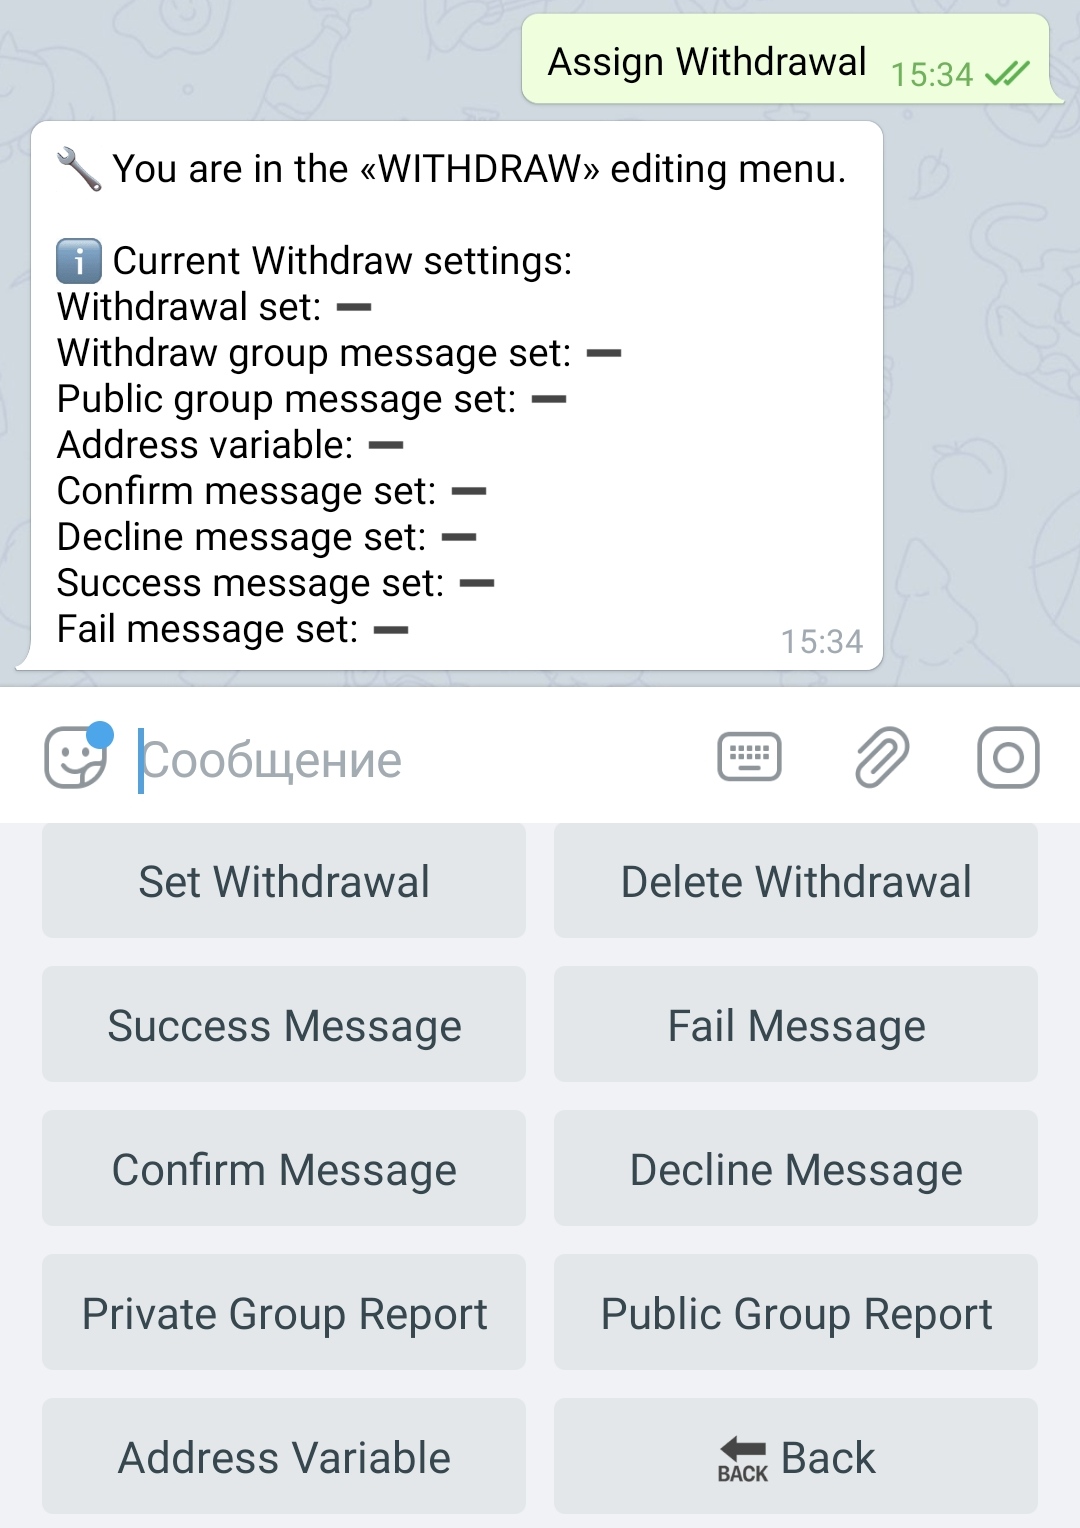
2. Basic setup
Please note that without the Basic Setup, the button cannot be considered active and all other changes may be reset after some time - so do not configure anything until you configure all its following parameters and thus activate the button.
Set Withdrawal
To start configuring the withdraw functionality, click "Set Withdrawal". Withdrawal settings are presented in the form of a step-by-step Settings Wizard. Note that the wizard's messages are containing additional instructions, Macros and all possible options for each step.
2.1 Setting the group where to send messages of withdrawal requests. The user in the bot requests a withdrawal - the admins added to the group, receives the user's data.
If you want to receive withdraw messages directly in to the bot and DO NOT want to send them to a group, press:
«Send to Owner Chat».
ONLY the owner of the bot will receive the messages, in this case.
The group must already be configured and the bot must be the admin in it. The group is pointed by pressing the button with the number corresponding to the required group. If this bot is not an admin in any group, then there will be nothing to choose from. Follow the link to see instructions on setting up a bot for working in groups. See the Settings Wizard message for additional instructions.
2.2 Specifying the user variable from which the specified withdrawal amount will be deducted. In other words, the withdrawal is carried out with this variable.
2.3 Specifying the minimum amount that the user can request for withdrawal.
2.4 Specifying the maximum amount that the user can request for withdrawal.
Setting up these parameters are optional. If the user specifies an amount that does not correspond to the parameters or there is not enough money on his balance, an error message will be displayed (the setting of which we will describe below).
2.5 The first message is an indication of the amount. This is the message that will be shown to the user when he clicks the "Withdraw Funds" button that you are creating. In this message, you must ask the user to enter the desired amount for withdrawal.
In all custom messages (here and below), you can use macros of your bot's variables, as well as additional macros that are specified in the instructions of the Settings Wizard for each step.
2.6 The second message is a request of user's details for translation. In this message, you must ask the user to indicate his address, wallet, phone number or other identifier in the format of the system for which the withdrawal is generated. You will be making a transfer to this wallet.
LIST OF SYSTEMS AVAILABLE FOR AUTOMATIC WITHDRAWALS:
Payeer - indicate the wallet address in the Payeer system in the format "Pxxxxxxxx"
Tron - indicates the wallet address in the Tron blockchain
CryptoBot - the user specifies his Telegram ID (you can enable the option «14. Self ID as address» - see below)
xRocket - the user specifies his Telegram ID (you can enable the option «14. Self ID as address» - see below)
2.7 The third message is confirmation. It is assumed that in this message you must: collect all the data obtained in the previous steps and present them to the user. Ask him to confirm his request. All additional macros available for this message are specified in the instructions of the Settings Wizard.
This completes the BASIC SETUP of the Withdraw Button.
3. Messages setup
Success Message
Here you can specify the message that the user will receive, if all the data entered by him is correct and the withdrawal request is sent to the administrators for consideration.
Fail Message
Here you can indicate the messages that the user will receive if the data entered by him is incorrect or the withdrawal conditions are not met (the requested withdrawal amount is greater than the amount on the balance, or less than the minimum, etc.).
Confirm Message (Confirm Msg.)
Here you can specify the message that the user will receive if his request was approved by the admin (this setting is optional).
In this message, you can use variable macros from the bot itself, but keep in mind that between sending the request (the information that the user will send) and the confirming reply (when the user receives the admin's response), some time may pass and the variable data may change. The confirmation message received by the user will contain data of the variables at the time of sending by the admin, so carefully consider the variables that you use in this message - the data of the same variable when requesting and when confirming, in theory, may differ. For example, use only global variables with more or less static data.
Decline Message (Decline Msg.)
Here you can specify the message that the user will receive if his request was declined by the admin (this setting is optional).
Ignore Message (Ignore Msg.)
Here you can specify the message that the user will receive if his request was ignored by the admin (this setting is optional).
4. Reports setup
Private Group Report
The setting allows you to generate a withdrawal request that will be received by admins in a private group. In this report, you must put all the data that will allow the admins in the group to make a decision on confirmation or refusal to withdraw, and also have in front of you all the data collected from the user. All additional macros available for this message are specified in the instructions for this option.
IMPORTANT: In the group to which these reports are received, only admins should be present and the privacy of the group should be ensured by you personally - since the user data (without which the withdrawal is impossible, and which, for this reason, must be present in each of the requests) are personal and should not be available publicly.
Public Group Report
Here you create a function (message) to duplicate the report, with data that can be presented publicly, that is a public report or confirmation of funds withdrawals. The settings are made using the step-by-step Settings Wizard.
IMPORTANT: This report is generated and sent to the group at the time of the withdrawal REQUEST by the user, and NOT at the time of the withdrawal request approval by the admin (i.e. not upon the fact of the withdrawal, but upon the fact of the request). There are no plans to change the existing mechanics at the moment. Please take this into account when composing your message.
IMPORTANT: We strongly recommend to DO NOT publishing any personal data of users - identificators, Telegram IDs, wallets of payment systems, mail addresses, etc., in a public space. All data in public messages and reports should be as anonymous as possible.
● Setting the group where to send the public report message. As for a private report, the group must already be configured and the bot must be the admin in it. If this bot is not an admin in any group, then there will be nothing to choose from. Follow the link to see instructions on setting up a bot for working in groups. See the Settings Wizard message for additional instructions.
● You can send a message to a public group both: immediately after the user has requested a withdrawal, and only after the withdrawal is approved by the administrator in the private group. This option is configured BEFORE adding the message itself.
● Adding a message for a public report. All macros of your bot are available for use in the public report, see the Settings Wizard message for additional instructions.
5. Additional settings
Address Condition
The setting allows checking the wallet addresses entered by the user for compliance with the Condition.
Functionality of «🧩Extensions» section:
Conditions
To connect, go in your bot:☞ 🔐Admin | 🧩Extensions | 📂Buttons
ATTENTION: Functionality uses «Tokens of Functions».
Package of «Tokens of Functions».
To purchase additional Tokens of Functions, go in your bot:☞ 🔐Admin | 🧩Extensions | 📂Actions
For an example of Conditions for checking wallet addresses, see the Variables and Functions Tutorial.
Address Variable
A variable can be assigned from the list of those available in the bot. If a variable is assigned, then:
● It can be displayed anywhere in the bot (since it is a regular variable, like any other). Including in the message in which you are requesting the User's Address in the Withdrawal button.
● If the variable already has a value, then the "Leave as Is" button appears at the address request stage. In this case, the stored value will be used.
● If a new value is entered by hand, it is saved to the specified variable and will be the current withdraw address of this user for the next time.
Do not ask for Address
The setting allows you to skip the step with the wallet address request for systems where you do not need it.
Switching the wallet address entry request mode.
Modes:On ▶️ - the function is enabled (default) - the user will be asked to enter their wallet address for withdrawal.Off ⏹️ - the function is disabled - the step with the wallet request will be skipped.
Self ID as address
The button is displayed in the settings only for the corresponding systems, which is determined by the specified PayID (see below).
At the stage of entering the wallet address, it replaces the standard TEXT input field and limits the input to only NUMERIC data; a button appears at the bottom that will allow the user to enter their Telegram ID by clicking.
Switching the wallet address input mode.
Modes:Off ⏹️ - the function is disabled (default) - entering text data.On ▶️ - the function is enabled - request for digital data or enter Telegram ID.
The option was originally intended for use with systems like xRocket and Cryptobot - identification of users in which are carried out using Telegram ID. However, due to its specifics, the option can be used for any systems in which user identification is carried out using account numbers - that is, where the address uses digital rather than text data.
Withdraw by Checks
The button is displayed in the settings only for the corresponding systems, which is determined by the specified PayID (see below).
Allows you to locally switch the withdrawal method for this button (withdrawal to Account or generation of a Check). The settings specified here have priority over the global setting in the Admin Panel for this payment system.
Switching the withdrawal mode.
Modes:As Admin ⏯️ - the global setting (default) is taken from the settings in the Admin Panel.On ▶️ - the function is enabled - withdrawal via Checks locally for this button.Off ⏹️ - the function is disabled - withdrawal by transfer to the specified account locally for this button.
When generating a Check - IT DOES NOT MATTER whether the bot user is a user of the payment system. Obviously, to access funds by Check, the user will have to log in to (create) an account of this payment system.
Commission
Each withdrawal can be assigned a Commission. The Commission Settings Wizard consists of three steps:
● Specify the commission from the withdrawal amount as a percentage. The parameter is OPTIONAL - specify only if necessary.
● Specify the minimum commission value that will be charged if the percentage commission (from the previous step) is less than this actual minimum amount. The parameter is OPTIONAL - specify only if necessary. The setting will only be available if you specified a percentage in the previous step.
● Specify a fixed commission amount for withdrawal. The fixed commission is set as a specific (absolute) value (not a percentage). The parameter is OPTIONAL - specify only if necessary.
Available commission macros:
●commission_prc - percent value set for commission
● commission_min - minimum commission amount
● commission_fix - fixed commission amount
● commission - actual commission amount, that taking into account all previous parameters
To show to the user, the amount of the percentage commission in actual currency, use the Expression:{round(%withdraw% * (%commission_prc% / 100), 2)}
Where:%withdraw% - is the withdrawal amount specified by the user (described above).%commission_prc% - commission percentage
All of the above commissions will apply - no commission supersedes or replaces the other.
The commission is always deducted from the withdrawal amount specified by the user.
Rate
Allows you to withdraw one currency with automatic conversion to another. For example, we deduct RUB and pay USDT. If there is a specified Rate, the Amount for Withdrawal entered by the user (minus all Commissions) will be MULTIPLIED by the specified Rate to obtain the actual value for withdrawal.
You can specify as a Rate:
• Number
• Macros (including macros for automatic rates)
• Expression
Set PayID
The button is displayed in the settings only for the corresponding systems - after Auto Withdrawals being activated.
The PayID specified here determines the payment system and affects the presence of additional options in the settings (see above).
This setting is available only for systems with fully automatic withdrawal and allows you to set up a fully automatic transfer of funds from the wallet of your third-party payment system to the corresponding wallet of your user. The transfer is carried out upon approval of the withdrawal by the admin in the group. The settings are made using the step-by-step Settings Wizard.
IMPORTANT: The ability to connect and configure this functionality is considered individually for each of you, so the button may either be absent or not work in your case. Instructions for setting up and obtaining the appropriate API keys will be provided to you in case of a positive decision to provide this functionality.
● Setting the PayID of your wallet. The ID number is assigned individually upon activation and will be presented to you when need be.
● Comment on automatic payment. This is the text that will be placed in the "Comment" or "Note" field when transferring funds automatically - if the payment system supports it. In this message, you can use macros of your bot variables, as well as additional macros that are indicated in the instructions of the Settings Wizard.
IMPORTANT: Sometimes the presence of a comment can cause errors in the operation of individual payment systems. Specify it, only if you are sure of what you are doing. In case of errors - DELETE the comment.
❖ Withdrawal of funds from the admin side
The message about a withdrawal request, will look something like this in a private admin group.

The message consists of 3 main parts:
1. The upper part - created by you in "9. Private Group Report".
2. "Raw Data" - technical information necessary for the bot itself. You cannot remove it from the message.
3. Two rows of inline buttons with similar names. The button's names in the bottom row have "🗨" symbol (Speech Bubble). If in steps 7 and 8 you have set any messages to notify the user about the administrator's actions, then if you press the buttons with that symbol from the bottom row, the user will receive these messages.
Confirm button
Pressing it means that the admin has approved and carried out the withdrawal of funds (in manual or automatic mode).
Ignore button
In essence, pressing this button simply removes the inline keyboard for this message - the funds deducted to the withdrawal "buffer" from the user's balance when requesting withdrawal WILL NOT be returned to his balance.
Decline button
By pressing it, the admin rejects the user's withdrawal request - the funds deducted to the withdrawal "buffer" from the user's balance when requesting the withdrawal WILL be returned to his balance.
❖ Actions in Withdraw buttons
● The Withdraw button (same as «Invoice» buttons of the corresponding payment systems) can contain Actions. ALL Actions of the Withdraw button are triggered AFTER the functionality of the Withdraw button itself - when the user has finished filling in the data and sent the request. Pre-Actions are triggered BEFORE the button's message itself is shown, Post-Actions - after the button message itself is shown.
● The Withdraw button can also use a macro type "_v" (the same as «Action of Numbers»). Use %withdraw_v% to access the amount requested by the user for Withdrawal.
Access to the macros, in some way, will allow you, for example, to keep statistics on withdrawal requests if necessary. We emphasize once again, that the macro contains exactly the sum of the REQUEST for withdrawal and this data cannot take into account possible (albeit rare) refusals in withdrawal. If withdrawals are declined too often, thereby violating your statistics, then you can add a command with all the necessary data of current withdrawal, to the output message coming from the user and return the necessary values to the distorted statistics using that command.
❖ Limiting the number of withdrawals
Further instructions are come from assumption that the Withdrawal button itself has already been created by you, following the steps above, and the withdrawal period is 24 hours (you can, of course, set your own period). The creation of a functional is presented in an order that makes it easier to understand the logic of its execution - if there is an understanding you can use more rational order of creation.
Required knowledge
● Work with Date and Time.
● Actions management.
● Conditions.
How it works
A separate button created, is going to be the main entry point, for the user. All validation functions are carried out in this new button, after which, by Action of Command, your user will be moved to an (invisible) button with actual Withdrawal functionality. The need to create a more complex mechanism is determined by the mechanics of Button Functions and their interaction with Actions and Conditions.
1. Create variables
Variable (Date and Time) - Go in your bot:☞ 🔐Admin | 🗄Variables | 📕Time | ➕Create Variable Variable name: withdraw_time, (you can use your own). The variable will store the time of the user's last withdrawal request.
2.1 Assign a command to the previously created Withdraw button
For example: /withdraw_222
The name of command should be given in a such way, that users may not accidentally or deliberately pick up this name and could not access the button directly. It is also advisable to change the name of the original Withdraw button, if it was previously available or visible to users.
2.2 Hide the Withdraw button you have created earlier
There are two ways to hide a button:
1. Switch it to the "Admin Only" mode - it will protect the functionality of the button, even if the user knows its name.
2. Make it "Invisible" - this option is preferable if the button needs to be hidden, not only from the user, but also during the daily routine of the admins.
Invisible buttons.
To connect, go in your bot:☞ 🔐Admin | 🧩Extensions | 📂Buttons
Obviously, you can add your own Condition to the button that directly carries out the Withdrawal of funds, this Condition will check the last withdrawal time saved in a variable.
3.1 Create a new button.
This button will be the main and the only visible to the user. Before that, rename the previously created Withdraw button if need be.
3.2 Add Actions to the new button:
● Select "Action of Initialization"
Variable to change: withdraw_time
Value: {dt_add(dt_now(), -24)}
This Action will replace the default value in the variable so that the Condition added below does not interrupt the execution of the chain of the following Actions.
● Select "Action of Conditions"
Condition: {dt_passed("%withdraw_time%") > 24}
Fail message: "You can order withdrawal once every 24 hours. Remaining time: {dt_left_hm((dt_add("%withdraw_time%", 24)), " - ", " hour(s)" , " minutes")} "
Button Behavior: Do not show content.
This Action will interrupt the execution of the Action's chain and show an error message.
● Select "Action of Commands"
Command: /withdraw_222 - the command assigned to the actual Withdraw button.
Option 1: Abort Execution (On) - (default)
This Action will send the user to the Withdraw button.
4.1 Back to the Withdraw button
Without leaving the Button Editor (if you exited, get back again) - go to the previously created (and now invisible) Withdraw button.
4.2 Add Actions to the Withdraw button:
● Select "Action of Numbers"
Variable to change: withdraw_time - created by us to store the "last request" time.
Operation type: Set Value
Value: {dt_now()}
Condition: No
This Action will set the time of the last withdrawal request, in the variable.
4.3 Adding a message to the Withdraw button
Go to the Post Editor and add a message.
Example: "Withdraw order time: %date% %time%. "
IMPORTANT: Adding a message to the Withdraw button is a must! Without the added message, the Action assigned for this button will not work and the time of the "last withdraw" will not be set in the variable. This is due to the mechanics of the withdraw function.
❖ Error messages
❌ Withdraw failed!
Error during sending withdraw request to the admin.
ℹ️ Try again, if the error continues - contact admin of the bot directly.
This message will be shown to the USER when he is trying to request a withdrawal using the «Withdraw Button» - if the bot cannot send a message to the group where withdraw requests should be received by admins.
Possible reasons:
1. You have not configured or incorrectly configured the group where withdrawal requests should be received.
2. Sometimes the ID of the group changes after changing the group's settings.
2. The bot has not been added to the group where withdrawal requests should be received.
3. The bot is not an Admin in the group and cannot send messages there.
If this message is NOT shown to EVERYONE, but only to some users, and NOT ALWAYS, but from time to time, then perhaps the reason is that you have too many withdrawal requests and the bot is hitting the Telegram limit for sending messages to the CHANNEL. Try sending requests to a group instead of a channel, the limits there are not so strict.
Button update fail
Sometimes the message appears even though everything looks correct.
Possible reasons:
1. The bot was unable to remove the buttons under the Withdrawal message.
2. The message may be too old.
3. The bot does not have editing permissions.
Try to create the withdrawal again following all the instructions; if the error does not go away and you have exhausted all options, write to support.
❌ Withdrawal cannot be created (wrong settings).
ℹ️ Contact bot admins.
This message will be shown to the USER when he is trying to request a withdrawal using the «Withdraw Button». The message is as neutral as possible and mostly intended for the admin.
Possible reasons:
1. Incorrect Withdraw Button settings.
Go to this button and look at the message yourself - the admin will be shown an extended version of the message with additional data. Then configure the button properly.
❖ Additional information
To organize the financial system of your bot, the following are also available (may come in handy):
Balance Transaction Log
Log (Journal, Journaling) of changes is a function that saves the information necessary to restore the sequence of charges and is a historical record of all changes affecting the balance of the bot.
Balance Transaction Log.
To connect, go in your bot:☞ 🔐Admin | 🧩Extensions | 📂Logs and Data
• • •
Exporting User Data
Allows you to export to a file the data of ONLY those users who at least somehow manifested themselves in your bot, besides just wandering through the menu.
Export of User Data.
To connect, go to your bot:☞ 🔐Admin | 🧩Extensions | 📂Logs and Data
• • •
Currency Exchange Rates
It will add to your bot automatically updated exchange rates, which will have all the properties of variables, and also have their own macros for each currency pair and each exchange direction.
Currency Rates.
To connect, go in your bot:☞ 🔐Admin | 🧩Extensions | 📂Logs and Data